Device Details
Overview
| Name | Version: | Muse Port 1.3 |
| Author: | tothesun |
| Device Type: | Audio Effect |
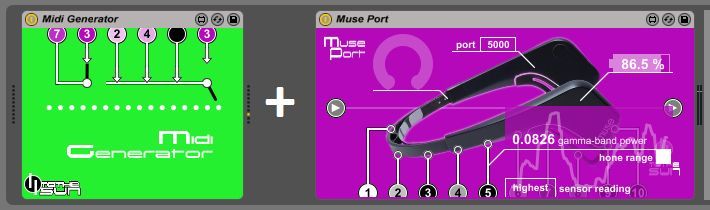
| Description: | Muse Port is an interface device that allows streaming of the data collected by Interaxon's brainwave-sensing Muse headband (http://www.choosemuse.com/) directly into Ableton Live. Five brainwave frequencies, three axes of accelerometer data, blink and jaw clench detection can all be graphed in real time along with your midi and audio recordings, as well as mapped to control any Live parameter. Muse Port is compatible with all versions of the Muse headband, although the newer heart rate and breath data streams will not be available if using the Muse 2 or S. To begin, you'll need to download Mind Monitor (https://mind-monitor.com/) and use your Android or iOS mobile device as a middleman. You can then connect the headband to your phone using Mind Monitor and it will stream the OSC data to Muse Port on your computer. Just make sure Muse Port is set to receive on the same port Mind Monitor is sending to (7000 default). That should really be all there is to it, but if you're not seeing any data come in to the device, try restarting Ableton Live, your computer or Mind Monitor. Sometimes the port can get claimed by a previous instance of something and need restarting to release it. The current UDP port, remaining battery life and the connection quality of the four sensors are all displayed in the top portion of the device. If there are one or more flashing circles in the headband-shaped icon, adjust the Muse on your head until all four sensors are reading well. Mouse over any of the numbered outputs along the bottom and a popup window will appear which displays a graph of the data streaming through it. Click along the wire leading to the numbered output to hold this popup in place. You may now select options in the popup itself. Sensor Mode Brainwave readings from the four sensors of the Muse can either be averaged as they arrive in the device or the highest can be used and the rest discarded. Hone Range Sometimes it can be useful to hone the range of the incoming data, in order to magnify its effect. If selected, the device will monitor readings and use only the highest and lowest it's seen to set the limits of the data stream, rather than the absolute full range of the sensor. The duration of this monitored history can be set via the Memory Span control in the settings. Clicking and dragging anywhere else in the popup will change the scaling of the graph. Click again on the wire to allow the popup to close. If you click on one of the numbered outputs itself a menu will appear. This menu displays all of the current mappings. Click 'Map New...' and then click on any enabled scalable parameter and it will be remote controlled by the data leaving the output. You can simultaneously map to up to four parameters per output. After a mapping has been assigned, you can click on its name in this menu to disconnect and remove it. Any of the data outputs may also be mapped through the main audio channel of the device itself. Click on the triangle-shaped input on the left and a menu will appear which lists all of the available connections. Alternatively, you may also map the actual audio signal passing through the device to any parameter you wish by clicking on the triangle-shaped output on the right. Click on the Muse Port logo to open up the settings menu. Memory Span For parameters with Hone Range selected, the device will look this many seconds into the past when determining the limits of its output range. Unlimited Memory Span The Memory Span will be as long as the time from when this, or the individual parameter's Hone Range control was selected. Automate Parameters The most convenient way to record Muse data in Live is to automate the parameter in question, thereby graphing it right along with your audio or MIDI recording in the arrangement view track. However, this unconventional strategy has its drawbacks. Namely the undo history will be compromised as it will perpetually fill while recording, which can be quite resource intensive both in terms of RAM and disk usage. Use with caution. Included in this download is a small companion device which generates midi notes based on an input stream. So for example, you could hone the range of the Relative Y-Axis Position output and send it to the Midi Generator to create a beat by nodding your head. Click here for the full description: https://sellfy.com/p/ns3f/. These are Max for Live devices. They require Ableton Live 9.1 Suite or newer and at least a trial of Max/MSP 6.1 or newer, which can be downloaded from http://cycling74.com/downloads/. Older versions of Live and/or Max may work just as well, but there are no guarantees. I'm always glad to hear feedback on my work! Please send any questions, issues or feature requests to to_the_sun@mail.com. And if you make something cool with one of my devices I'd really like to hear it! If you want I can do what I can to send some traffic to it, especially if it's on soundcloud. Mine's https://soundcloud.com/to_the_sun. Version 1.2 update Version 1.2 works with the latest OSC paths and also takes advantage of some of the newer measurements they added, such as absolute vs. relative brainwaves, as well as Concentration and Mellow scores. In addition if you click on the Muse Port logo you will see that streaming data (and therefore mapping it) must be turned on and is not on by default. Note that the five standard brainwaves report absolute values, whereas before they reported relative session values, and now there are five separate relative brainwave parameters which can be automated (graphed). The two experimental scores Concentration and Mellow can also be automated, and since version 1.2, they can be streamed in real time and therefore mapped to any parameter in Live. In the device they have taken the place of the 3rd and 5th outputs along the bottom. Previously these were the Alpha and Gamma outputs, from which Mellow and Concentration are derived, respectively. If you're savvy with Max for Live, you can access the data that is Retained In History by using a [coll ii-history] object; this is how I've been doing my experimentation. If for some reason you want to use the previous version, it is also included in your download, along with the legacy SDKs for both Windows and OS X that are required for it. Version 1.3 update Version 1.3 parses the OSC messages in a more robust way, which can be necessary when dealing with Muse Direct. Also included are three minor update versions that handle the differences in the OSC incurred by routing through a mobile app like Muse Monitor: 1.3.1 - has the alpha and gamma brain waves reinstated in place of Mellow and Concentration which are deprecated in the mobile API. 1.3.2 - in addition, blink and jaw_clench have a default 100 ms delay between on and off which compensates for the way the mobile API handles these messages. 1.3.3 - alpha and gamma are reinstated and blink and jaw_clench toggle on and off, which is often more useful in practice. If you want to turn some parameter on by blinking and then turn it off again later by blinking again, you may want to use this version, regardless of whether you are routing through Muse Monitor. |
Details
| Live Version Used: | 9.1.5 |
| Max Version Used: | 6.1.8 |
| Date Added: | Jun 28 2022 20:53:08 |
| Date Last Updated: | Jul 18 2024 00:05:34 |
| Downloads: | 1 |
| Website: | https://www.dropbox.com/scl/fi/1wwd6e7jt6o4qaox0m3lh/Muse-Port.zip?rlkey=keqcdlm45ponm9kdumv1fl758&s |
| ⓘ License: | AttributionNonCommercialShareAlike |
Average Rating
Log in to rate this device |
-n/a- |
Comments
Hi,
could it be possible to adapt this device to other OSC bridges ? I use Petal Metrics which runs natively on the Mac, when Mind Monitor is only available on mobile. Using a desktop app would simplify the setup.
could it be possible to adapt this device to other OSC bridges ? I use Petal Metrics which runs natively on the Mac, when Mind Monitor is only available on mobile. Using a desktop app would simplify the setup.
Posted on June 14 2024 by tguyfr |
Report Issue
I did recently hear about something called Muse LSL which could serve as a replacement for Mind Monitor, but I haven't tried it myself so I can't say for sure.
Posted on July 03 2024 by tothesun |
Report Issue
Hi, I am not getting any Accelerometer XYZ data coming in, it stays at "63" in the Ableton Macro. Is there a way to fix this? I see it on the Mind Monitor app, just not in M4L.
Posted on April 30 2025 by NewMedia |
Report Issue
I use Muse Port Version 1.3 to record from mind monitor into ableton live. It works well but
abelton always crashes after 30 minutes. Any ideas why? Thanks
abelton always crashes after 30 minutes. Any ideas why? Thanks
Posted on May 21 2025 by danigal |
Report Issue
Login to comment on this device.
Browse the full library
I bought the muse port last week, but I'm having an issue with the comunication between muse port and midi generator, I can't send information from muse port to midi generator, what can I do?
Thanks for your answer!
me email is dasmash@gmail.com