Device Details
Overview
| Name | Version: | Transmutator 1.1 |
| Author: | opticon93 |
| Device Type: | MIDI Effect |
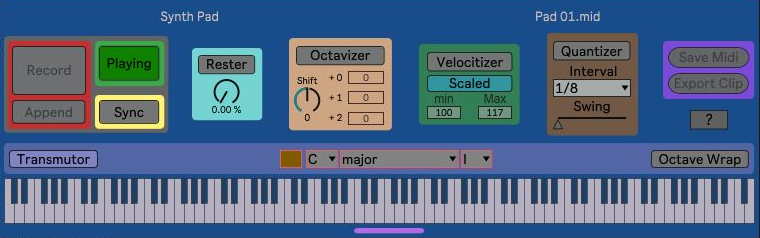
| Description: | Hi Folks, this Transmutator is a major upgrade of my old Transmutor device. From left to right, the main new modules are the Midi Looper/Recorder, several Midi Mutators and Export/Save. I know the following is all tl;dr, but I'm trying to avoid any mysteries. On the other hand, most of it is pretty intuitive (just make sure Ableton is playing when you hit the Play button). Also, most of this is in the help file included in the device. When the Transmutor module is on, it maps the white keys of your keyboard to the chosen Key (C, C#, ..., B), Scale (over 20 choices) and Degree (I-VII). Meanwhile, the black keys of your keyboard are ignored. Basically, any three sequential white keys (you can play and record any number of notes, ... I've played with both of my entire forearms) get mapped to the appropriate triad in that Key, Scale, Degree (which may have sharp/flat notes). It's for ham-fisted fools like me who simply want to paw at the keyboard. Octave Wrap maps the higher notes of a scale back around to the bottom of the octave. For those of you who play well enough to use the black keys at will (and change Key, Scale and Degree at will), you may want to disable the Transmutor and just use the other modules. In either case, the black keys are recorded, but they are always ignored by the Transmutor. The Midi Looper is very simple with four main controls. Pressing the Record button clears the current recording and starts recording all incoming midi. This midi is temporarily stored as-is within a [seq] object. Press the Record button again to stop recording. You can Record whether Ableton is playing or not. Append adds midi notes to the end of the previous recording. The Play button only works when Ableton is playing. In this case, the midi recording (or any dropped midi file) is played back from the first note and looped (the Play button blinks yellow on each loop) at the original speed (120 BPM) until the Play button is turned off (or Ableton is stopped). Once I've made and finalized a recording, I generally just automate the Play button in the Arrangement view. If the Sync button is turned on, the playback BPM will match Ableton’s BPM. Many of the buttons cannot be used simultaneously or cannot be used while Ableton is stopped/playing. For example, you cannot Record and Append at the same time. While Recording/Playing, the other buttons that should not be used are greyed out. For safety, it's probably best not to press any buttons that are greyed out. The Midi Mutators can be activated or deactivated individually. The Rester module allows you to set the percentage of notes that are rested. At 0%, all notes are played. At 100%, no notes are played. The way it is currently wired, it will actually rest entire chords, instead of some of the notes of a chord. The Octavizer has a knob to Shift the entire recording up or down five octaves. From this base (+0) octave, each individual note can be randomly shifted up 1 or 2 octaves (or not shifted at all). If +0 and +1 are both set to the same nonzero weight (with +2 at 0), the notes will either be unshifted or shifted up 1 octave, with equal probability. If you set +1 to a higher weight, there will be a bias towards the +1 octave. If +0, +1 and +2 are all set to the same nonzero weight (say 27), each of the three octaves will be played with equal probability i.e. each octave will play a third of the time. If all weights are zero, only the base octave is played. The Velocitizer remaps the velocity of each note to be within the min and Max. Although I'm ham-fisted, I don't always play as loud as I want (especially when trying to play softly) and I also usually play louder than I want. In Scaled mode, the input velocities are linearly mapped to the min/Max range. In Random mode each velocity is randomly chosen from the min/Max range. The Quantizer only works while Ableton is playing. The Interval includes standard settings, triplets and multiples of whole bars. The Swing setting goes from 0-50%. Finally, there are two types of file saving. Save Midi saves the original, pristine midi that was Recorded into the [seq] object (which unfortunately, won’t save the midi within itself when the Live set is re-opened). It brings up the standard “Save as” dialog box. I recommend that you save the midi File to the folder where your current project is. After this, you should load the midi File by simply dragging and dropping it anywhere on the device. Once this is done, the midi File is saved with the Live set. When Ableton is playing, a second midi recorder automatically starts in real time. This captures the culmination of any active Midi Mutators. It also records any other midi coming into the track, kind of like a super cheap overdub. While Ableton is playing (and the Midi Looper is Playing), press the Export Clip button to place a midi Clip on the current track in Session view (make sure this track is highlighted/selected in Ableton). On some systems, a pop up might appear which can be completely ignored. This Clip contains all midi generated up to the time you pressed the Export Clip button. Its probably a good idea to wait for the midi recording to loop at least once before exporting. Caution: Whenever Ableton is stopped, this real time recording is cleared. It is also cleared when the Ableton sequencer is in looping mode, at the beginning of each Ableton loop set up in the Arrangement View. Once the Clip is on the track, you can edit it. At this point, I guess you can just move on and work with the Clip, if that's your thing. Or you can right click on the Clip and “Export Midi Clip…” to save the edited midi Clip to your project folder as a midi File. Drop this new midi File back onto the Transmutator to save it within the device in the Live set. In this situation, you might want to turn off most of the Midi Mutators and just use the Looper, since their output has already been recorded into the newly loaded midi File. On the other hand, it could get pretty experimental with some of the Mutators still on. The keyboard display is for visual purposes only. The upper left displays the Track name this device is on. The upper right shows the currently loaded midi File. Usage: Place on a Midi Track and set "Monitor" to "In" Put an instrument after it Bang your keyboard Share and Enjoy. Altogether, this device fully cannibalizes and modifies Nonagon and Schlam's Midi Quantizer, Oxb’s Midi Recorder and denleschae’s Retake found here https://maxforlive.com/library/device/7393/midi-quantize https://maxforlive.com/library/device/7450/midi-recorder https://maxforlive.com/library/device/1620/retake Please share any bugs or suggestions in the comments below. |
Details
| Live Version Used: | 11.01.12 |
| Max Version Used: | 8.2.1 |
| Date Added: | Mar 07 2022 00:47:52 |
| Date Last Updated: | May 30 2022 17:43:01 |
| Downloads: | 836 |
| ⓘ License: | AttributionNonCommercialShareAlike |
Average Rating
Log in to rate this device |
-n/a- |
Files
| Device File: | Transmutator 1.1.amxd |
Comments
LOL @ "For folks like me who simply want to paw at the keyboard". That sounds right up my alley sir - thanks!
Posted on March 07 2022 by FreddyFingaz |
Report Issue
Thank you, I hope you like it. Make sure to get the newest version.
Posted on March 09 2022 by opticon93 |
Report Issue
Hi Everyone. My apologies. Once again, it looks like I forgot to freeze the device. There are several important objects required for the transmutor and velocitizer modules.
Anyway, the complete device is now up. Sorry, thanks.
Anyway, the complete device is now up. Sorry, thanks.
Posted on March 09 2022 by opticon93 |
Report Issue
I must admit I slept on this first time I saw it; I skimmed across and saw "schwarzonator" in my mind, if that makes sense?
I feel the work that went into this warrants a deep dive. I'll see if this can be a part of my live rig now.
I feel the work that went into this warrants a deep dive. I'll see if this can be a part of my live rig now.
Posted on May 29 2022 by wetterberg |
Report Issue
Thank you. I hope you like it.
Oh yeah, the Schwarzonator. I haven't thought about that thing in so long, but it really was the main device that made me want to learn Max in the first place. This is certainly along the same lines.
Oh yeah, the Schwarzonator. I haven't thought about that thing in so long, but it really was the main device that made me want to learn Max in the first place. This is certainly along the same lines.
Posted on May 30 2022 by opticon93 |
Report Issue
P.S. Thanks for all of your advice over on the Cycling74 forums.
Posted on May 31 2022 by opticon93 |
Report Issue
Dang is this using some compiled libs? Not compatible with Apple Silicon :(
Posted on October 21 2023 by JD |
Report Issue
Login to comment on this device.
Browse the full library